Tools
Please find below: A) Downloads, and instructions for setting up B) Multiscan and C) BRAT pipeline.
A) Downloads
MULTISCAN
BRAT
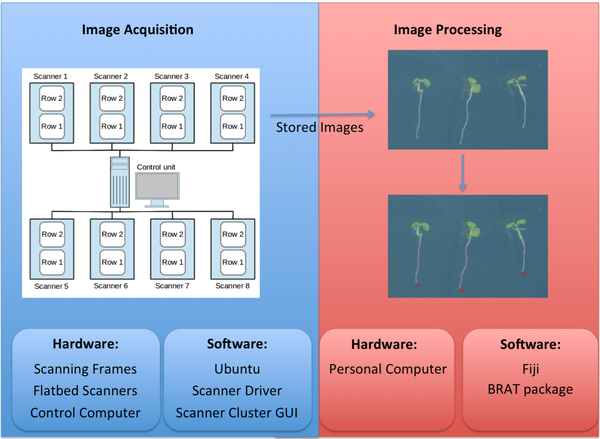
B) Image acquisition pipeline (Multiscan)
1) Flatbed Scanner Setup
Flatbed CCD-scanners. We use Epson V600 Photo Scanners. We would recommend using the same scanners, since the image acquisition software was developed these scanners. Additionally, we have tried cheaper scanners with similar resolution, but the noise in the images was drastically greater than with the V600 scanners.
Scanner cluster operating computer. We use a HP Compaq 8200 Elite Small Form Factor (Product No. XY146ET#ABD). Any similar computer being able to run Ubuntu 10.04.4 LTS should work fine.
Scanning Frame to place plates. We used custom scanning frames to place our agar plates. A technical drawing of the scanning frames can be downloaded here. Alternatively, one can use the same templates for cutting frames out of cardboard and fixing them onto the scanners.
2) Control Computer Setup
To run our image acquisition tool a Linux operated computer is used. We tested our tool on Ubuntu 10.04 LTS (64bit) and Ubuntu 12.04 LTS (64bit), but any Linux distribution should be fine. The following commands describe the installation process for Ubuntu. Make sure to use the appropriate commands for your distribution.
Installation of Java:
Our scanner control GUI needs a Java runtime environment. We tested with Oracle-jre-7. To install Oracle-jre-7 download the compressed binary file (.tar.gz file extension). Note: The version number (7u45) might be different from the one used here.
Extract files from the archive:
tar -xvf jre-7u45-linux-x64.tar.gz
The package will be extracted into ./jre-1.7.0 directory. Move the directory to /usr/lib:
sudo mv ./jre1.7.0* /usr/lib/jvm/jre1.7.0
Install your JRE7:
sudo update-alternatives –install “/usr/bin/java” “java” “/usr/lib/jvm/jre1.7.0/bin/java” 1
Select the JRE default:
sudo update-alternatives –config java
Test the JRE:
java -version
This should produce something like:
java version “1.7.0_45”
Java(TM) SE Runtime Environment (build 1.7.0_45-b18)
Java HotSpot(TM) 64-Bit Server VM (build 24.45-b08, mixed mode)
To operate the scanners, Ubuntu scanner drivers need to be installed. The “sane-project” can be installed from the repository:
sudo apt-get install sane
You need to install the correct drivers for your scanners. If you use the Epson V600 Photo, you can download the relevant packages:
- iscan-data_1.27.0-1_all.deb
- iscan_2.29.3-1~usb0.1.ltdl7_amd64.deb
- iscan-plugin-gt-x820_2.2.0-1_amd64.deb
from here: Epson drivers
Use “sudo dpkg -i to install the packages.
sudo dpkg -i iscan-data_1.27.0-1_all.deb
sudo dpkg -i iscan_2.29.3-1~usb0.1.ltdl7_amd64.deb
sudo dpkg -i iscan-plugin-gt-x820_2.2.0-1_amd64.deb
Test your configuration:
scanimage -L
This should produce (depending on your setup):
device `epkowa:interpreter:002:013′ is a Epson Perfection V600 Photo flatbed scanner
device `epkowa:interpreter:002:012′ is a Epson Perfection V600 Photo flatbed scanner
device `epkowa:interpreter:002:010′ is a Epson Perfection V600 Photo flatbed scanner
device `epkowa:interpreter:001:021′ is a Epson Perfection V600 Photo flatbed scanner
device `epkowa:interpreter:001:020′ is a Epson Perfection V600 Photo flatbed scanner
device `epkowa:interpreter:001:019′ is a Epson Perfection V600 Photo flatbed scanner
device `epkowa:interpreter:001:018′ is a Epson Perfection V600 Photo flatbed scanner
device `epkowa:interpreter:001:017′ is a Epson Perfection V600 Photo flatbed scanner
On the control computer a graphical user interface is used to operate all scanners and facilitate a simple image acquisition. This GUI can be downloaded here.
Create directory and copy Multiscan.jar and multiscan.cfg to your desired location. Then change the file permissions:
sudo mkdir /opt/multiscan
sudo cp ./Multiscan.jar ./multiscan.cfg /opt/multiscan/
sudo chmod a+r /opt/multiscan/*
To identify the scanners, we need to know the physical usb-ports they are connected to. The “usb-devices” command will show this numbers. Search for your scan devices in the output and remember the vendor, prodID, bus and port numbers for each scan device:
usb-devices
… cut …
T: Bus=01 Lev=02 Prnt=02 Port=01 Cnt=02 Dev#= 17 Spd=480 MxCh= 0
D: Ver= 2.00 Cls=ff(vend.) Sub=ff Prot=ff MxPS=64 #Cfgs= 1
P: Vendor=04b8 ProdID=013a Rev=01.00
S: Manufacturer=EPSON
S: Product=EPSON Scanner
C: #Ifs= 1 Cfg#= 1 Atr=c0 MxPwr=2mA
I: If#= 0 Alt= 0 #EPs= 2 Cls=ff(vend.) Sub=ff Prot=ff Driver=(none)
T: Bus=01 Lev=02 Prnt=02 Port=02 Cnt=03 Dev#= 19 Spd=480 MxCh= 0
D: Ver= 2.00 Cls=ff(vend.) Sub=ff Prot=ff MxPS=64 #Cfgs= 1
P: Vendor=04b8 ProdID=013a Rev=01.00
S: Manufacturer=EPSON
S: Product=EPSON Scanner
C: #Ifs= 1 Cfg#= 1 Atr=c0 MxPwr=2mA
I: If#= 0 Alt= 0 #EPs= 2 Cls=ff(vend.) Sub=ff Prot=ff Driver=(none)
… cut …
Use a text editor (e.g. gedit, nano, …) to modify multiscan.cfg. Change the bus and port for each scanner (format: “scanner .“). You can also change the ranges which should be scanned. The format for the first plate is: “range1 ”.
sudo gedit /opt/multiscan/multiscan.cfg
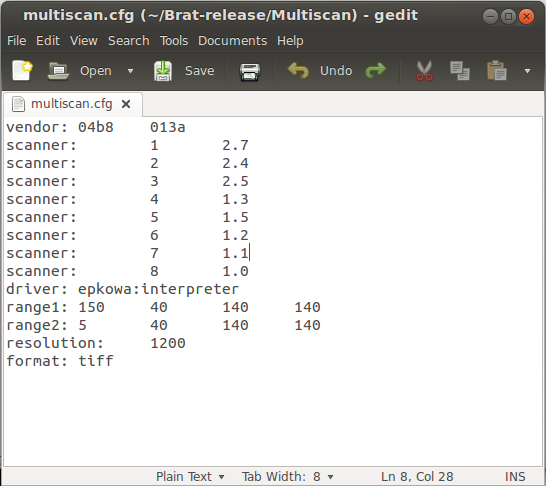
Save your file and exit the text edit.
You are now ready to start Multiscan:
java -jar /opt/multiscan/Multiscan.jar /opt/multiscan/multiscan.cfg
If you want, you can create a shortcut with the above command on your desktop.
3. Using the image acquisition pipeline
Download a brief manual here, describing the operation of the scanner cluster.
C) Image processing pipeline (BRAT)
1. Setting up the BRAT image processing pipeline
- Download Fiji and install it.
- Download the BRAT plugin. Unpack the archive and copy the folder with the name “Brat” into the plugins folder of Fiji (Fiji.app/plugins).
- Copy the folders “jung” and “java_sift” to the jars folder of Fiji (Fiji.app/jars). See this link for details.
- After restarting Fiji, the Brat plugins become available.
Note 1: One of the advantages of BRAT is, that it can also be run on a cluster using the Fiji headless mode. The installation depends on the clusters scheduling system. We have submission scripts and other technical instructions available. Please contact us, if you want to install it on a cluster.
Note 2: BRAT is open source. You can download the source code here. Please note that it is under the GNU license, see below.
License
This program is free software; you can redistribute it and/or modify it under the terms of the GNU General Public License as published by the Free Software Foundation; either version 3 of the License, or (at your option) any later version. This program is distributed in the hope that it will be useful, but WITHOUT ANY WARRANTY; without even the implied warranty of MERCHANTABILITY or FITNESS FOR A PARTICULAR PURPOSE. See the GNU General Public License for more details. You should have received a copy of the GNU General Public License along with this program. If not, see www.gnu.org/licenses/.
2) Using the BRAT image processing software
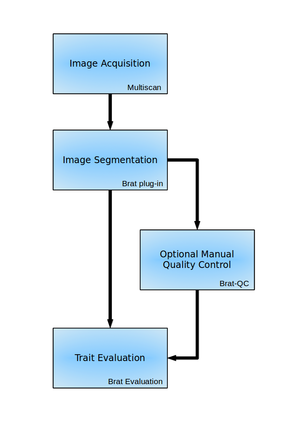
Fig. 2: Workflow of the BRAT pipeline
BRAT was developed with the intention of keeping its usage as simple as possible. Once installed, BRAT does not require many options.
Download the manual here for the BRAT pipeline.
We also provide a set of example images for downloading to use for testing the pipeline.
Please let us know if you should have any questions, can’t find information or have suggestions.
* “GravitropicScan” is now “GraviScan” in the latest version (04/30/2021).
- Install “GraviScan” in your computer, which runs scanners.
– The computer must run the Linux operating system and the open-source scanning framework “SANE” (https://sane-project.org) needs to be installed in it for the scanning software to work. We tested on the LTS Ubuntu versions 16.04 and 18.04 (https://www.ubuntu.com). The computer needs to provide enough USB ports to connect the desired number of scanners. - Set scanners vertically (landscape orientation) and attach plates for the observation tightly (See A Multiplexed, Time-Resolved Assay of Root Gravitropic Bending on Agar Plates).
– Any conventional scanners that are equivalent to EPSON Perfection V600 Photo and are supported by the SANE framework could potentially be utilized. However, it cannot be guaranteed that “GraviScan” will work with these. - Open “GraviScan” application by clicking “GraviScan” icon in your start menu. Alternatively, open it from Terminal by a code equivalent to “java -jar /opt/graviscan/GraviScan.jar /opt/graviscan/graviscan.cfg”. Modify the code according to the directory in which you install “GraviScan”.
- In the main window of “GraviScan”, specify which scanners should be used (check box “Use:”) and if images of one or both plate positions should be acquired (check box “Row 0” for bottom and “Row 1” for base scanning position in relation to the connection of a scanner and its lid).
- Select the folder path to save the image data by clicking on the folder selection button (labeled with “…”) and specifying the experiment prefix that will be used for naming the files that are automatically stored.
- Set scan time to four minutes or a desired duration which is longer than four minutes and select continuous scan mode. Click on “Scan” to initiate scanning. The images are stored as 1200 dpi 24-bit RGB TIFF files and automatically named based on the initial user.
- Once scanning is completed for the time planned, stop the program and close “GraviScan”.